Posts

Showing posts with the label Summer Camp 2012

Walter Anderson ABC Styrofoam Block Prints

Image
As part of our June vacation to the Mississippi Gulf Coast, we're revitalizing one of our favorite projects: Walter Anderson ABC Block Prints!  Walter Anderson made a whole series of alphabet prints that inspired this Try It Out! Born in 1903 in New Orleans, LA, Anderson attended some of the finest boarding schools and art academies in the country. His mother Annette McConnell Anderson attended the Newcomb School of Fine Arts in New Orleans and wanted all of her children to become artists. The family bought a tract of land on the Mississippi Gulf Coast in 1918 with the intention of turning it into a kind of family artist colony that would enable them to create and sell their art. Anderson joined the new family business Shearwater Pottery in 1928, where he lived and created until his death from lung cancer in 1965.  Descendants of the Anderson still live and create in Ocean Springs. Visitors can see his work on display at the Walter Anderson Museum of Art in d...

Aztec Calendar Stone

Image
Our Summer Camp kids had a blast making these Aztec Calendar Stones!  The kids were able to carve, print, and paint all in one project! This project was done during our All About Art Week. Materials: Brown Craft Paper cut into circles Print Foam Ballpoint Pens Scissors Brown and Black Washable Paint Gold Acrylic Paint Paintbrushes Small Styrofoam plates Water cups 1)    Precut the brown craft paper into large circles 2) Hand each child a circle and tell them to crinkle the paper 3) Unravel and recrinkle the paper 4) Put the paper off to the side and hand out the print foam and pens 5)  Carve the Sun God in the print foam 6) Cut out the Sun God out of the print foam 7) Lightly paint the foam with either brown or black washable paint 8) Print the foam in the middle of the brown craft paper circle 9) Paint designs around the circle using brown, bla...

African Masks

Image
This summer, our preschool camp kids traveled to Africa, and absolutely loved making these African masks!  This project takes a little bit of prep, but was worth the effort. Materials Paper Plates (Pre cut eyes and mouth and punch four holes on the bottom) Various colors of yarn Bright Construction paper cut into various shapes and sizes Glue Sticks 1) Prep all materials: pre cut eyes and mouth and punch four holes, cut yarn, and cut construction paper 2)  Show them pictures or replicas of African masks 3) Pass out the paper plates and glue sticks. 4) Hold up the different shapes and ask the children to identify the various shapes and colors 5) Give the children a handful of the shapes, and let the children glue on the shapes on the masks. 6) When finish, let them pick four pieces of yarn, and tie to the bottom on the masks. 7) Punch holes on the sides and tie yarn, so the children can wear their masks!

Goldfish Sun Catcher

Image
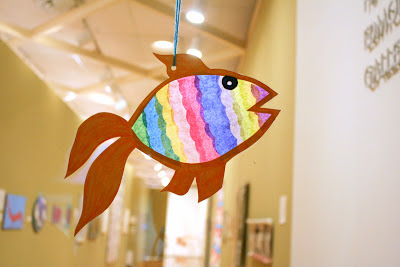
This colorful little goldfish sun catcher requires a bit of prep, but is definitely worth all the effort!  Our kids during Summer Camp absolutely loved making these. Materials Goldfish Template (white card stock) Markers Tissue paper Scissors Plastic Wrap Tape Elmer's Glue Small Styrofoam plates Paintbrush Hole Punch Yarn *All templates and tissue paper must be cut before the project 1) Hand out goldfish templates and markers and allow the kids color one side of the goldfish template 2) Tape a large piece of plastic wrap down on the table over the goldfish template 3) Hand out paintbrushes, plates of glue, tissue paper, and scissors. 4) Thinly paint glue on the plastic wrap within the goldfish's body 5) Lay tissue paper vertically, trimming the pieces as needed.  Encourage the kids to overlap various colors to make a vibrant color fish. 6) After the entire goldfish's body is covered, gently brush more glue on top of the tissue pa...

Puffy Paint Bugs

Image
These Puffy Paint Bugs are too fun for the kids!   They love getting to use Puffy Paint, and they also love having the opportunity to create their own bugs.   We did this project in conjunction with our Nature and Science camp. Materials Paper plates Pencils Scissors Markers Puffy paint Elmer's Glue Googly Eyes Smocks 1) First, draw a bug on the paper plate, making it as large as possible, with the legs extending all the way out to the edges.   Be imaginative!   Draw a butterfly, an ant, a spider, a ladybug – whatever you want! 2) Cut the bug out with the scissors. 3) Color the bug in with Markers.   Encourage adding designs! 4) Use Puffy Paint to add detail and trace lines to make your bug really cool! 5) Glue two googly eyes on your bug. 6) Allow to dry completely.

Spider Snacks

Image
Along with craft ideas, we are also going to post an occasional recipe from the crafty snacks that we make for our kids.  This snack is one of our favorites, and it goes great with a nature theme! Ingredients: Pretzel sticks Ritz crackers Peanut butter Mini-marshmallows Raisins Here are the steps for one individual Spider Snack: 1. Spread ½ Tablespoon peanut butter on one Ritz cracker.   2. Assemble 4 pretzel sticks on left and right as spider legs (8 pretzel sticks total). 3. Place second Ritz cracker on top, using slightly more peanut butter if necessary. 4.   Use a small dab of peanut butter to stick the mashmallows on top of the Ritz cracker, and the raisins on top of marshmallows as the eyes. Nutritional values per serving: Calories: 97, Total Fat 5.5g, Saturated Fat 0.9g, Cholesterol 0g, Sodium 145mg, Total Carbohydrate 10.6g, Dietary Fiber 1.5g, Protein 2.5g, Vitamin A 0%DV, Vitamin C 0%DV, Calcium 1.3%DV,...

Gyotaku Japanese Fish Printing

Image
This is a project we like to do with our older kids, ranging from ages 5-12.  Any age enjoys this fun project! Materials Rubber Fish Paint (Chromacryl or regular Acrylic recommended) Sponge brushes Small canvas bags Newspaper for tables Smocks 1. Coat the rubber fish with an even layer of paint, making sure to get the paint into the detailed areas, such as scales, and on to the fins. 2. When the fish is covered, gently place the bag on top of the fish.   3. Press firmly on the bag against the fish, paying attention to fins, so that the details of the fish will print onto the canvas. 4.   Lift bag slowly off the fish and allow the bag to dry. Note: we recommend having the children print on a piece of paper before the bag in order to practice.   The print will smear more on the paper, but it gives the children an understanding of the process.

Theora Hamblett Pointillism Trees

Image
In honor of one of our favorite permanent exhibitions, we are going to begin our blog posts with a craft inspired by the artist, Theora Hamblett , a folk artist known for her trees done in the style of pointillism.  We did this project with our Day Camp kids.  The suggested age would be 3-5 years old. Materials Q-tips Paintbrushes Washable paint (green, black, white, yellow, orange) Cups for water Paper towels Newspaper for table Smocks Blue construction paper 1. Paint the bottom of the construction paper (suggested color: green) to imitate the ground or grass. 2. Paint the tree trunks first with stripes of color using the Q-tips on the construction paper.  We suggest using black, white, and gray, like the original artist. 3. Create dots of leaves on the tree and on the ground with the Q-tips.  Use bright colors such as orange and yellow to imitate autumn leaves!   Let the finished product dry for at least ...