Posts

Showing posts from August, 2012

Chinese Accordion Dragon Puppet

Image
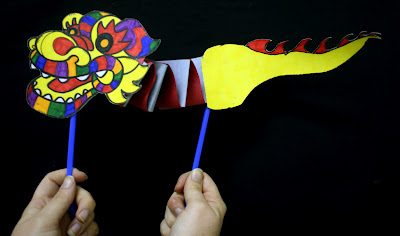
Our Chinese Accordion Dragon puppet was a huge hit for our Chinese Art Summer Camp kids.  They loved decorating their own dragon, naming their dragon, and creating special powers! Materials : Dragon’s head and tail template (link at bottom of entry) Markers Scissors Long strips of construction paper Tape Straws 1) Pass out the dragon’s head and tail templates, markers, and scissors to all the students 2)  Have students color the head and tail (see template at the bottom) 3) After the student finishes coloring, have the student cut out the head and tail 4)  Have students write their name on the back of the head and tail 5) Let the student choose two long strips of construction paper 6)  Demonstrate to the student the accordion fold for the body 7) Take the ends of each strip and connect the corner so the strips make a right angle or L shape 8) Take the bottom color strip and fold over the top color strip 9) Take

Paper Sculptures

Image
This project requires a few materials, but is so much fun!  Our summer camp kids enjoyed creating their paper sculptures.  Some kids made their sculptures really high, and some create words with their sculptures. Materials: Construction Paper Scissors Glue Sticks 1/4 Poster Board 1) Pass out poster board, construction paper, scissors, and glue sticks. 2) Glue down one sheet of construction paper on the poster board. 3) Cut out strips of construction paper, varying in size and color. 4) Glue the strips into different shapes to create your sculpture! NOTE: To ensure that the glue will hold, press down after gluing for roughly 15-20 seconds.

Gyotaku Japanese Fish Printing Ocean Scene

Image
This fun printing art project allows the kids to print, get messy, use soft pastels, and create their own ocean scenery!  This project is similar to the Gyotaku Japanese Fish Printing that we did in Summer Camp, but with a few more added steps. Materials: Rubber Fish Black Chromocryl Paint Rice Paper Copy Paper Styrofoam Plates Sponge Brushes Scissors Blue Construction Paper Glue sticks Soft Pastels Tissue Paper 1) Hand out styrofoam plates of black chromocryl paint, rubber fishes, sponge brushes, and copy paper. 2) Let the children lightly coat the fish with paint, but make sure to get all the details! (i.e. fins, scales) 3) Let them practice with copy paper: put the copy paper on top of the fish and press down on the paper so that the details of the fish show. 4) After they practice, pass out the rice paper. 5) Lightly coat the fish with paint and then print on the rice paper. 6) Put the prints to the side and allow them to dry. 7) Hand out blue cons

Chinese Shadow Puppets

Image
During our Chinese Art Summer Camp, our campers discovered the art of Shadow Puppets .  They were able to choose between the famous Monkey King, a fierce dragon, Chinese Princess, or Chinese soldier.  The children enjoyed painting and playing with their shadow puppets! Materials: Shadow Puppet Templates on White Card stock Scissors Watercolor palettes Paintbrushes Water cups Brads Straws Tape Hole Punch Googly Eyes* *We added googly eyes to the dragon shadow puppets Note: Templates can be found here or here 1) Pass out the shadow puppet templates and scissors 2) Have the students cut out their shadow puppets 3) Pass out the watercolor, paintbrushes, and water cups. 4) Have the students paint their shadow puppets with bright, vibrant colors 5) After the paint dries, punch holes in the joints and fasten the parts with a brad. 6) Hand out two straws per child and tape the straws to the joints.  These will act as handles to control the shadow

Teddy Graham Nature Scene Snack

Image
This fun, healthy snack was served during our Nature and Science camp.   This snack is super easy to make and only needs three ingredients! Ingredients Nabisco Graham Crackers Chocolate Teddy Grahams Marshmallow Creme 1)    Break a Nabisco Graham Cracker in half and spread ½ tbsp. of marshmallow crème on the bottom half. 2)    Assemble Teddy Grahams as if they are bears standing on snow 3)    Enjoy this fun, easy snack! *This recipe is dairy-, nut-, and peanut-free. Nutritional values per serving: Calories: 72, Total Fat 2g, Saturated Fat 0.4g, Cholesterol 0mg, Sodium 70mg, Total Carbohydrate 13g, Dietary Fiber 1g, Protein 1g, Vitamin A 0%DV, Vitamin C 0%DV, Calcium 3.5%DV, Iron 7%DV

Mose Tolliver Folk Art

Image
We did this fun art project with our toddler summer camp.  These little ones learned about the Folk Artist, Mose Tolliver , and replicate his famous watermelon painting.  The kids had fun going through the gallery, learning how to layer paint, and painting their own watermelon! Materials: Plexiglass (with one side sanded) Washable paint (Green, Red, Black, and Purple) Paintbrushes Water cups Small paper plates Paper towels *This project can also be done on cardboard instead of plexiglass.  1) Show the children examples of Mose Tolliver's paintings.  Point out how the simplicity of his paintings.  The background and border is one color. 2) Hand out the plexiglass/cardboard, paint, paintbrushes, water cups, and paper towels to each child 3) Tell the children to paint a thin layer of green paint on the sanded side of the plexiglass. 4) Then take more green paint and draw a big smile for the rind of the watermelon. 5) After it dries, take the purpl

Aztec Calendar Stone

Image
Our Summer Camp kids had a blast making these Aztec Calendar Stones!  The kids were able to carve, print, and paint all in one project! This project was done during our All About Art Week. Materials: Brown Craft Paper cut into circles Print Foam Ballpoint Pens Scissors Brown and Black Washable Paint Gold Acrylic Paint Paintbrushes Small Styrofoam plates Water cups 1)    Precut the brown craft paper into large circles 2) Hand each child a circle and tell them to crinkle the paper 3) Unravel and recrinkle the paper 4) Put the paper off to the side and hand out the print foam and pens 5)  Carve the Sun God in the print foam 6) Cut out the Sun God out of the print foam 7) Lightly paint the foam with either brown or black washable paint 8) Print the foam in the middle of the brown craft paper circle 9) Paint designs around the circle using brown, black, and gold paint 10) Let dry

African Masks

Image
This summer, our preschool camp kids traveled to Africa, and absolutely loved making these African masks!  This project takes a little bit of prep, but was worth the effort. Materials Paper Plates (Pre cut eyes and mouth and punch four holes on the bottom) Various colors of yarn Bright Construction paper cut into various shapes and sizes Glue Sticks 1) Prep all materials: pre cut eyes and mouth and punch four holes, cut yarn, and cut construction paper 2)  Show them pictures or replicas of African masks 3) Pass out the paper plates and glue sticks. 4) Hold up the different shapes and ask the children to identify the various shapes and colors 5) Give the children a handful of the shapes, and let the children glue on the shapes on the masks. 6) When finish, let them pick four pieces of yarn, and tie to the bottom on the masks. 7) Punch holes on the sides and tie yarn, so the children can wear their masks!

Goldfish Sun Catcher

Image
This colorful little goldfish sun catcher requires a bit of prep, but is definitely worth all the effort!  Our kids during Summer Camp absolutely loved making these. Materials Goldfish Template (white card stock) Markers Tissue paper Scissors Plastic Wrap Tape Elmer's Glue Small Styrofoam plates Paintbrush Hole Punch Yarn *All templates and tissue paper must be cut before the project 1) Hand out goldfish templates and markers and allow the kids color one side of the goldfish template 2) Tape a large piece of plastic wrap down on the table over the goldfish template 3) Hand out paintbrushes, plates of glue, tissue paper, and scissors. 4) Thinly paint glue on the plastic wrap within the goldfish's body 5) Lay tissue paper vertically, trimming the pieces as needed.  Encourage the kids to overlap various colors to make a vibrant color fish. 6) After the entire goldfish's body is covered, gently brush more glue on top of the tissue pa

Puffy Paint Bugs

Image
These Puffy Paint Bugs are too fun for the kids!   They love getting to use Puffy Paint, and they also love having the opportunity to create their own bugs.   We did this project in conjunction with our Nature and Science camp. Materials Paper plates Pencils Scissors Markers Puffy paint Elmer's Glue Googly Eyes Smocks 1) First, draw a bug on the paper plate, making it as large as possible, with the legs extending all the way out to the edges.   Be imaginative!   Draw a butterfly, an ant, a spider, a ladybug – whatever you want! 2) Cut the bug out with the scissors. 3) Color the bug in with Markers.   Encourage adding designs! 4) Use Puffy Paint to add detail and trace lines to make your bug really cool! 5) Glue two googly eyes on your bug. 6) Allow to dry completely.